We have received some questions recently about how to most efficiently set up new benefits participants under MissionConnect. Due to the number of variables involved, different benefit types, premium categories, billing entities, setting up a completely new participant will always be a multi-step process. If you have several new participants to add this could be somewhat daunting, so we want to make sure that MissionConnect: Benefits is streamlining this process as much as possible for you.
Part of that is making sure that you, our users, are aware of the most efficient route to follow through the program, the following will be a step-by-step example of that including screenshots.
In order to add a new benefits participant the person must be in the database, if they are not in the database, then you first need to use MissionConnect: Center to add a new person. For clergy the person would need to be setup with an appointment and then have compensation added before calculated benefits, like CRSP, would be able to calculate correctly, all of this would be completed in Center before starting these steps in Benefits. For this example I have added a new pastor to the database, his name is Joe Riggins and I have appointed him to the Albuquerque First UMC 07/01/2012 and given him fictitious compensation in a test database.
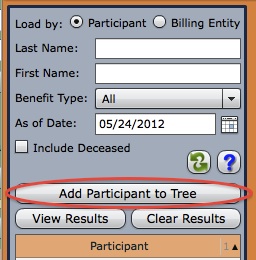
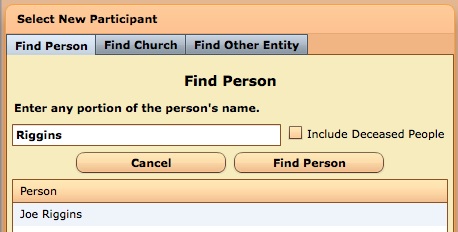
1. Since Joe Riggins is not a participant in any benefits at this point I cannot use the regular search, instead I will use the “Add Participant to Tree” button. Then using the Find Person search box we locate Joe Riggins and select him as the participant that we want to add.
2. After Joe has been selected all of the participant management panels load for him, but they reflect data as of the current billing date. If the participant is being added for the current billing cycle then this is fine, in our example however we are adding him for the future and since his appointment doesn’t start until July 1 we need to change the billing date dropdown at the top left to show 07/01/2012. Once we do that it will correctly show his Pension Base Comp.
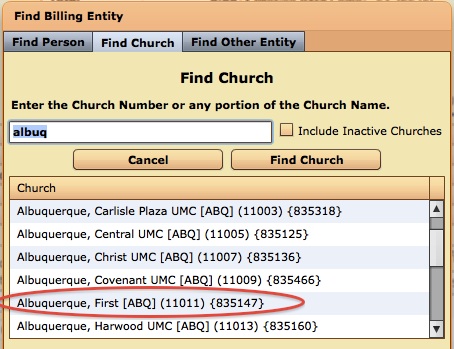
3. Now we need to start adding benefit types for Joe, to do so click the green plus button shown in the screenshot above and select the benefit type to add, for Joe we are first going to add CRSP DB. The Benefit Types panel is automatically opened for us and since Joe does not have any billing entities set up the Find Billing Entity search box pops up. We search for Albuquerque First and select it from the list.
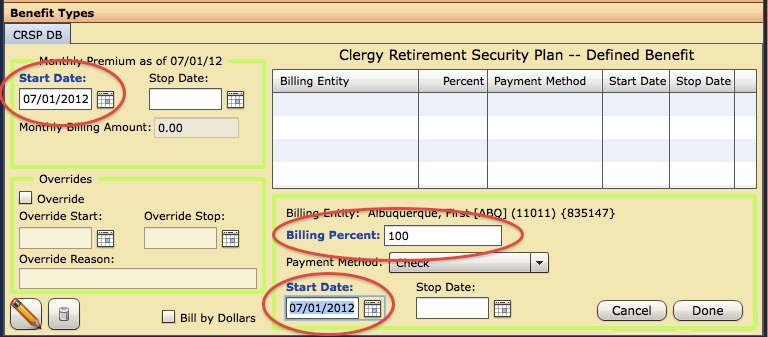
4. Next we have to enter the start date for both the benefit type itself and the billing entity, as well as the billing percent. Click Done and then Click Save and Joe will be all set up for CRSP DB.
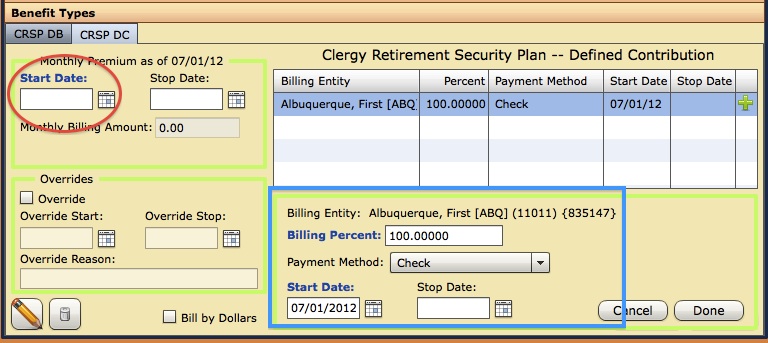
5. Joe also wants to participate in CRSP DC, so following the same steps from above we click the green plus button and this time select CRSP DC from the list of benefit types. Since we set up CRSP DB to bill by percent and Joe does not have multiple concurrent appointments, the system now sees that he has a “Global Billing Entity” of Albuquerque First. When we select CRSP DC from the add benefit type list it will now automatically populate the billing entity panel with all of that information. The only thing we have to fill in this time is the start date, click Done, click Save and Joe is all set up for CRSP DC. The following screen shot has a blue square indicating all of the billing entity information that is automatically filled in on the second and subsequent benefit types when the participant has a Global Billing Entity.
We could continue following this process to add more benefit types for Joe.
Important tips for using the Global Billing Entity concept:
1. Global Billing Entity only works if you are billing by percents, it will work with a split billing by percent as well, for example if Joe Riggins was responsible for 10% of all of his benefits and Albuquerque First covered the remaining 90% it wold work the same as the above steps show. If you choose to use “Bill by Dollars”, then the system cannot extrapolate that across other benefit types since they all have unique billing amounts.
1a. If you do use billing by dollars for one benefit type, for example Medical, but for all others you bill by percent, then the way to streamline this setup is to follow the above steps for all of the bill by percent benefit types first and then add Medical as a bill by dollars benefit type last, that way the Global Billing Entity will automatically fill in until the end.
2. If the participant has multiple concurrent appointments the Global Billing Entity concept cannot be used.
Please feel free to comment with any questions that you have about this process or with any suggestions that you have for improving the workflow.
